

Base Sepolia Testnet

Note (Base era): As of 2025-07-25, Aavegotchi’s canonical home migrated to Base. Legacy Polygon testnets (Mumbai/Amoy) are not the primary reference chain for the wiki anymore. See Migration to Base (2025).
This page shows how to connect your wallet to Base Sepolia (Base testnet) so you can use Aavegotchi test environments (when available) and view Base Sepolia contracts.
Contents
Adding Base Sepolia to your MetaMask
To connect to the Base Sepolia testnet, add it as a network in MetaMask.
1). First, open the extension and click the “Ethereum Mainnet” button on the top.
2). Select “Custom RPC”.
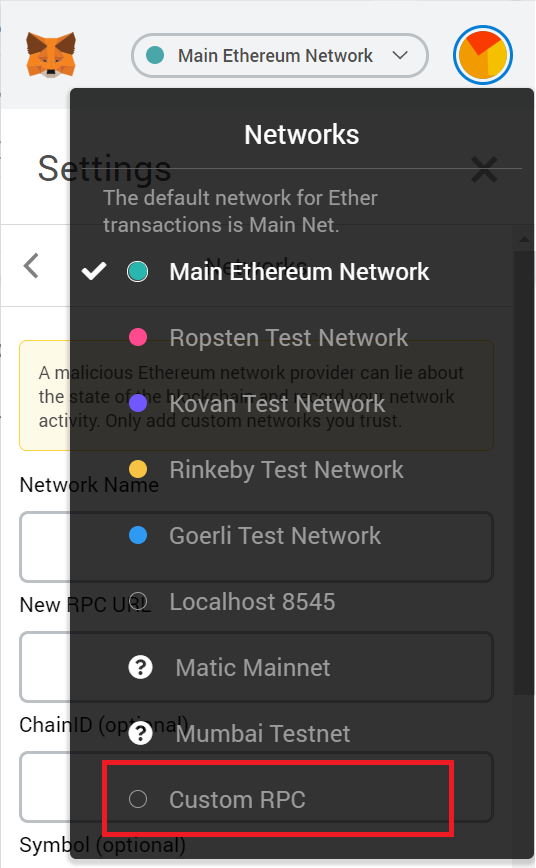
3). Enter the following settings:
Network Name: Base Sepolia
New RPC URL: https://sepolia.base.org
Chain ID: 84532
Currency Symbol (optional): ETH
Block Explorer URL (optional): https://sepolia-explorer.base.org/
Once you’ve added everything, click “Save”. You are now on Base Sepolia.
Reference (network params): https://docs.base.org/base-chain/quickstart/connecting-to-base
Getting Sepolia ETH
You’ll need Sepolia ETH to transact on Base Sepolia.
1). Use a reputable Sepolia faucet to obtain test ETH.
2). In MetaMask, ensure you’re on Base Sepolia (chain id 84532).
3). Send the Sepolia ETH to your wallet address and confirm it appears on Base Sepolia.
Tip: Some faucets deliver Sepolia ETH on Ethereum Sepolia first. If you receive ETH on Ethereum Sepolia, you may need to bridge it to Base Sepolia using a testnet bridge flow. Follow the latest Base docs for testnet bridging guidance.
Viewing Aavegotchi contracts on Base Sepolia
The wiki maintains Base Sepolia contract addresses here:
If you are using an Aavegotchi test app, always confirm the target chain (Base Sepolia) and contract addresses from official sources before signing transactions.